Create and send quotations
Once a qualified lead has been converted into an opportunity, the next step is to create and deliver a quotation. This process can be easily handled through Odoo’s CRM application.
Create a new quotation
To create a new quotation, open the , revealing the Pipeline page on the main CRM dashboard.
From here, click on any opportunity to open it. Review the existing information and update any fields, if necessary.
Note
If a quotation has already been created for this opportunity, it can be found by clicking on the Quotations smart button at the top of the top of the form. The number of existing quotations is listed on the smart button, as well.
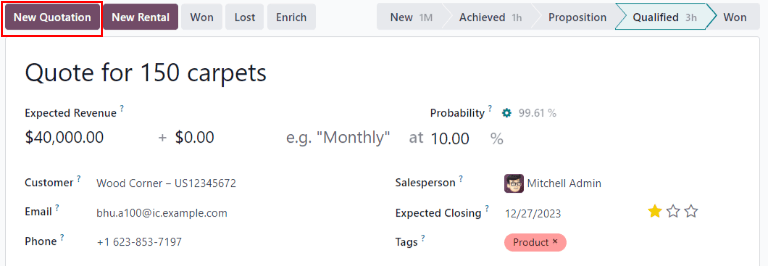
At the top-left of the form, click the New Quotation button.

Important
The Customer field is not required on the opportunity form.
However, customer information must be added or linked before a quotation can be sent. If the Customer field is left blank on the opportunity, clicking the New Quotation button opens a pop-up window with the following options:
Create a new customer: creates a new customer record, using any available information provided on the opportunity form.
Link to an existing customer: opens a drop-down field with existing customer names. Select a name to link this new quotation to an existing customer record.
Do not link to a customer: the quotation will not be linked to a customer, and no changes are made to the customer information.
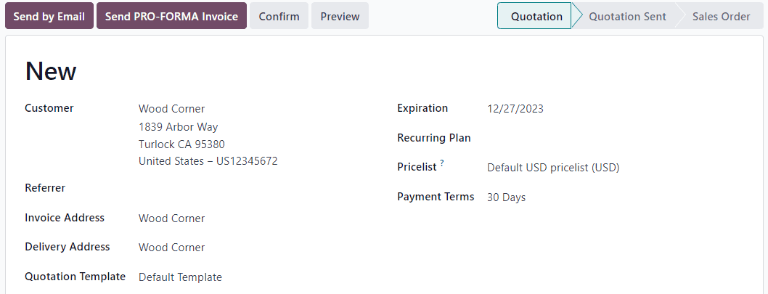
Once this button is clicked, a new quotation form appears. Confirm the information in the top half of the form, and update any missing or incorrect fields:
Customer: the company or contact for whom this quotation was created.
Referrer: if this customer was referred by another customer or contact, select it from the drop-down menu in this field.
Invoice Address: physical address where the invoice should be sent.
Delivery Address: physical address where any products should be delivered.
Quotation Template: if applicable, select a pre-configured quotation template from this field.
Expiration: date when this quotation is no longer valid.
Quotation Date: creation date of draft/sent orders, confirmation date of confirmed orders. Note that this field is only visible if Developer mode (debug mode) is active.
Recurring Plan: if this quotation is for a recurring product or subscription, select the recurring plan configuration to be used.
Pricelist: select a pricelist to be applied to this order.
Payment Terms: select any applicable payment terms for this quotation.

Tip
The Expiration field automatically populates based on the creation date of the quotation, and the default validity time frame.
To update the default validity time frame, navigate to and update the Default Quotation
Validity field. To disable automatic expiration, enter 0 in this field.
When the desired changes are complete, click Save.
When using a quotation template, the expiration date is based off of the Quotation Validity field on the template. To alter the validity date computation on a template, go to .
Then, click on a template to open it, and update the number in the Quotation Validity field.
Order lines
After updating the customer, payment, and deadline information on the new quotation, the Order Lines tab can be updated with the appropriate product information.
To do that, click Add a product in the Order Lines tab.
Next, type the name of an item into the Product field to search through the product catalog. Then, select a product from the drop-down menu, or create a new one by selecting Create or Create and Edit.
After selecting a product, update the Quantity, if necessary. Confirm the information in the remaining fields.
To remove a line from the quotation, click the 🗑️ (trash can) icon.
Repeat the steps above until the quotation is complete.
Preview and send quotation
To see a preview of the quotation as the customer will see it, click the Preview button. Doing so opens a preview in the Customer Portal.
After reviewing the customer preview, click Return to edit mode to return to the quotation form in the backend.
When the quotation is ready to deliver to the customer, click the Send by Email button.
Doing so opens a pop-up window with a pre-configured email message. Information from the quotation, including the contact information, total cost, and quotation title are be imported from the quotation.
A PDF of the quotation is added as an attachment to the email.
Note
A pre-loaded template is used to create the email message. To alter the template, click the internal link to the right of the Load template field, located at the bottom of the email pop-up window.
To select a new template, select an option from the Load template drop-down menu.
Proceed to make any necessary changes to the email, then click Send. A copy of the message is added to the Chatter of the of the record.
After a quotation is sent, the originating opportunity’s Quotations smart button updates with a new count. This quotation, and all other quotations can be accessed through this smart button at the top of the opportunity in the CRM app.
Any quotations attached to the opportunity that are confirmed, and have therefore been converted to sales orders, will be deducted from the number listed on the Quotations smart button. Instead, the value of the sales order will appear in the Orders smart button located in the same control panel.
Mark an opportunity won or lost
In order to keep the pipeline up to date and accurate, opportunities need to be identified as won or lost once a customer has responded to a quotation.
To mark an opportunity as won or lost, return to the opportunity using the breadcrumbs at the top-left of the quotation form. Or navigate to and click on the correct opportunity to open it.
At the top-left of the form, click on either the Won or Lost button.
If the opportunity is marked won, a green Won banner is added to the record, and it is moved to the Won stage.
Marking an opportunity as lost, via the Lost button opens a Mark Lost pop-up window, where a Lost Reason can be entered.
From the Lost Reason drop-down field, choose an existing lost reason. If no applicable reason is available, create a new one by entering it into the Lost Reason field, and clicking Create.
Tip
It’s best practice to try and use pre-configured Lost Reason values as much as possible or to limit the creation of new values only to sales team leads. Using consistent values for this parameter will make pipeline analysis easier and more accurate when filtering for the Lost Reason parameter.
To set up new values for this field, navigate to , and click both New`and :guilabel:`Save for each new entry added to the list.
Additional notes and comments can be added in the Closing Note field.
When all the desired information has been entered in the Mark Lost pop-up window, click Mark as Lost.
Upon clicking Mark as Lost, the pop-up window disappears, and Odoo returns to the opportunity form, where a new red Lost banner is now present in the upper-right corner of the opportunity.
Once an opportunity is marked as lost, it is no longer considered active, and it is removed from the pipeline.
In order to view a lost opportunity from the pipeline, click the down arrow icon to the right of the search bar, and select either Lost or Archived from the drop-down menu that appears.
Important
While opportunities that have been marked as lost are considered Archived, be advised that, in order for an opportunity to be included as lost in reporting, it must be specifically marked as lost, not Archived.