Activities
Activities are follow-up tasks tied to a record in an Odoo database.
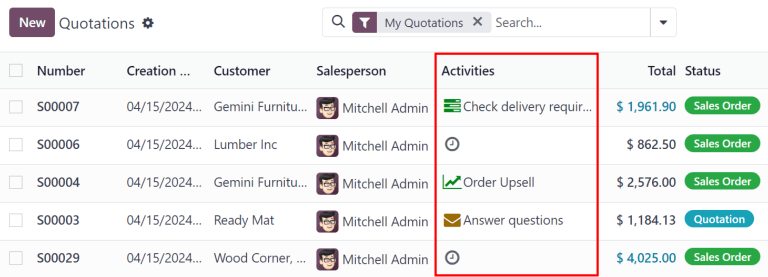
The icon used to display activities varies depending on the activity type:
🕘 (clock): the default icon, which appears if nothing is scheduled.
📞 (phone): this icon appears if a phone call is scheduled.
✉️ (envelope): this icon appears if an email is scheduled.
✔️ (checkmark): this icon appears if a to-do is scheduled.
(group of people): this icon appears if a meeting is scheduled.
(arrow pointing up above a line): this icon appears if a document is scheduled to be uploaded.
(pencil in a box): this icon appears if a signature request is scheduled.
Schedule activities
Activities can be scheduled on any page of the database that contains a chatter thread, Kanban view, list view, or activities view of an application.
Chatter
Activities can be created from the chatter on any record.
To schedule a new activity, click the Activities button, located at the top of the chatter. In the Schedule Activity pop-up window that appears, fill out the Schedule Activity form.

Kanban view
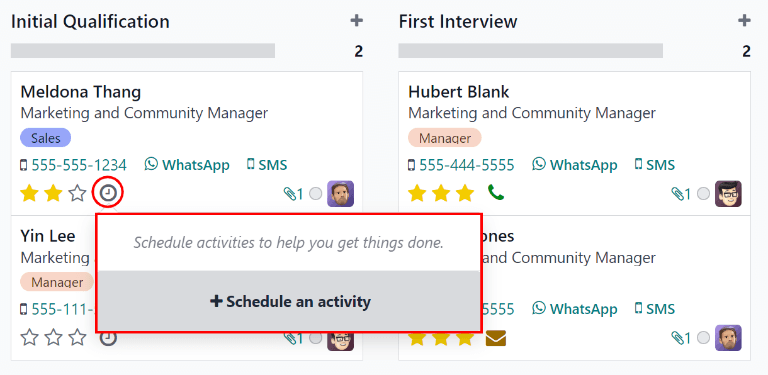
Another way that activities are created is from the Kanban view in an application.

To do so, click on the 🕘 (clock) icon located at the bottom of an individual record.
Click + Schedule An Activity, then proceed to fill out the Schedule Activity form.
Note
If a record already has a scheduled activity, the 🕘 (clock) icon is replaced by the icon that represents the existing scheduled activity. Click on the activity type’s icon to schedule another activity.
List view
Activities can also be created from a list view.
If the Activities column is hidden, reveal it using the (additional options toggle) icon in the far-right of the top row, represented by two horizontal lines with two dots.
Then, click on the 🕘 (clock) icon for the record the activity is being added to, then click + Schedule an activity. Proceed to fill out the Schedule Activity form that appears.
Note
If a record already has a scheduled activity, the 🕘 (clock) icon is replaced by the icon that represents the existing scheduled activity. Click on the activity type’s icon to schedule another activity.
Activity view
Most applications in Odoo have an Activity view available. If available, a 🕘 (clock) activity icon is visible in the top-right of the main menu bar.
To open the activity view, click the 🕘 (clock) activity icon.

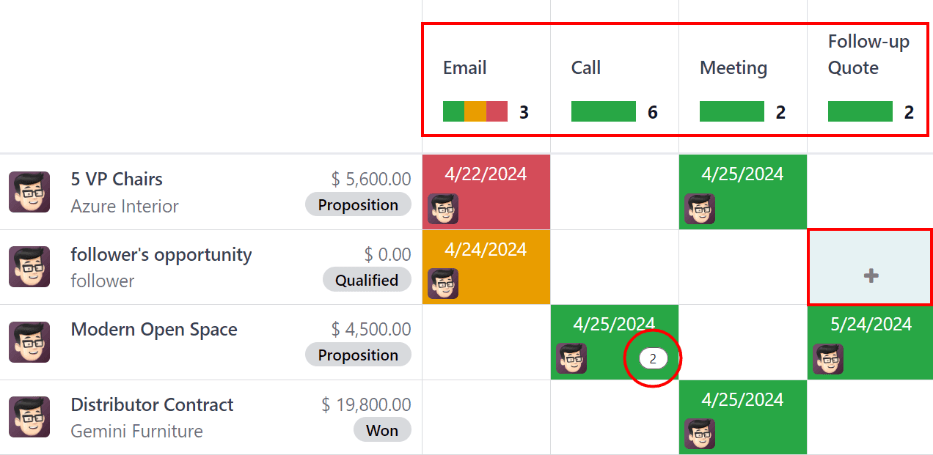
In this view, all the available activities are listed in the columns, while the horizontal entries represent all the individual records.
Activities that appear green have a due date in the future, activities that appear orange are due today, while activities appearing red are overdue.
Color bars in each column represent records for specific activity types, and display a number indicating how many activities are scheduled for that type.
If multiple activity types are scheduled for a record, a number appears in the box, indicating the total number of scheduled activities.
Note
Activity colors, and their relation to an activity’s due date, is consistent throughout Odoo, regardless of the activity type, or the view.
To schedule an activity for a record, hover over the corresponding field, and a ➕ (plus sign) appears. Click the ➕ (plus sign), and then fill out the Schedule Activity form.
Schedule Activity form
Activities can be scheduled from many different places, such as from the chatter of a record, or from one of multiple views in an application, when available: the Kanban view, list view, or activity view.
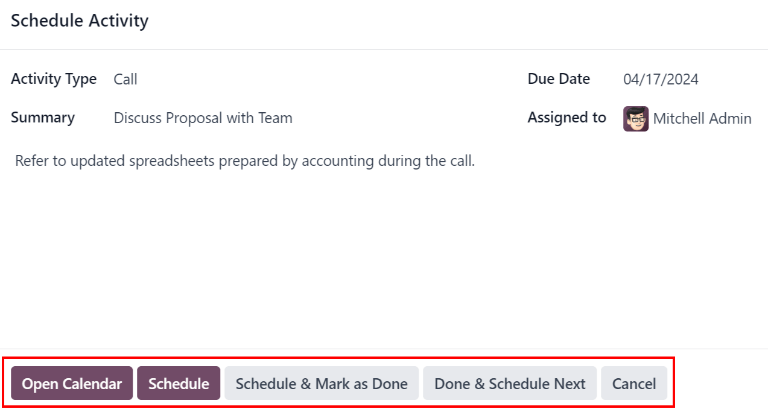
Enter the following information on the form:
Activity Type: select the type of activity from the drop-down menu. The default options are: Email, Call, Meeting, or To-Do. Depending on what other applications are installed, additional options may be available.
Note
Individual applications have a list of dedicated activity types. For example, installing the Sales application makes Order Upsell available, while installing the Sign application makes Request Signature available.
Summary: enter a short title for the activity, such as
Discuss Proposal.Due Date: using the calendar popover, select the activity’s deadline.
Assigned to: by default, the current user populates this field. To assign a different user to the activity, select them from the drop-down menu.
Notes: add any additional information for the activity in this field.
When the Schedule Activity pop-up window is completed, click one of the following buttons:
Open Calendar: opens the user’s calendar to add and schedule the activity.
Click on the desired date and time for the activity, and a New Event pop-up window appears. The summary from the Schedule Activity pop-up window populates the Title field.
Enter the information in the New Event pop-up window, then click Save & Close to schedule it. Once scheduled, the activity is added to the chatter under the Planned Activities section.
Important
The Open Calendar button only appears if the Activity Type is set to either Call or Meeting.
Schedule: schedules the activity, and adds the activity to the chatter under Planned Activities.
Schedule & Mark as Done: adds the details of the activity to the chatter under Today. The activity is not scheduled, and is automatically marked as done.
Done & Schedule Next: adds the details of the activity to the chatter under Today. The activity is not scheduled, is automatically marked as done, and a new Schedule Activity pop-up window appears.
Cancel: discards any changes made on the Schedule Activity pop-up window.
All scheduled activities
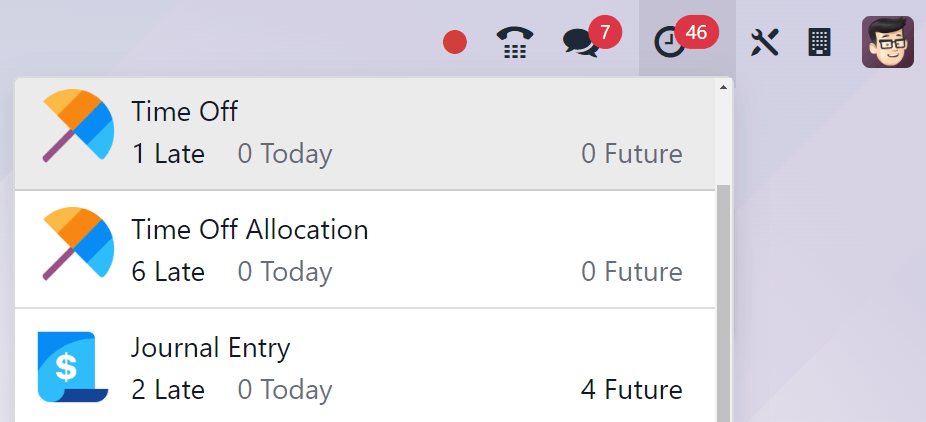
To view a consolidated list of activities, organized by application, click the 🕘 (clock) icon in the header menu, located in the top-right.
If any activities are scheduled, the number of activities appear in a red bubble on the 🕘 (clock) icon.
All activities for each application are further divided into subsections, indicating where in the application the activity is to be completed. Each sub-section lists the number of scheduled activities that are Late, due Today, and scheduled in the Future.
Example
In the Time Off application, one activity is scheduled to be done in the All Time Off requests dashboard, and six activities are scheduled to be done in the Allocations dashboard.
These requests appear in two separate lists in the all activities drop-down menu: one labeled
Time Off and one labeled Time Off Allocation.
Request a document
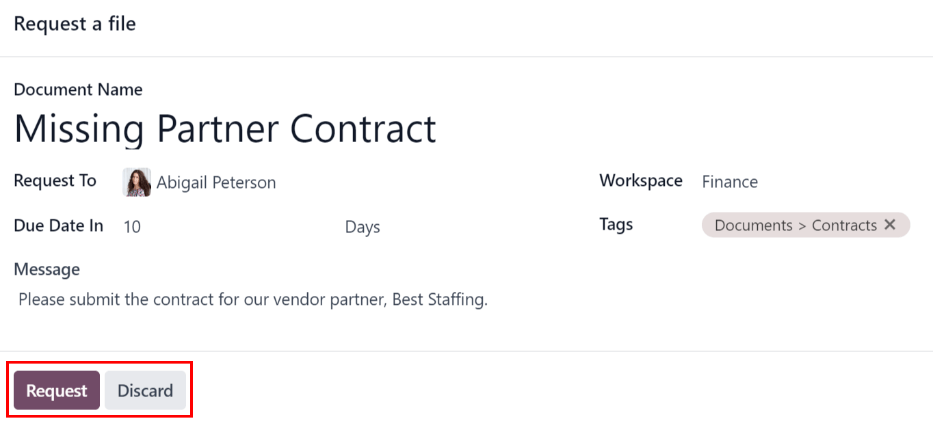
The option to Request a Document is available at the bottom of the list of all scheduled activities, the option to Request a Document appears. Click Request a Document, and a Request a file pop-up window appears.
Enter the following information on the form:
Document Name: enter a name for the document being requested.
Request To: select the user the document is being requested from using the drop-down menu.
Due Date In: enter a numerical value indicating when the document is due. Next to this field, a Days field is visible. Click Days, the default option, to reveal a drop-down menu. Select the desired time-frame option from the list. The options are Days, Weeks, or Months.
Workspace: using the drop-down menu, select the specific Workspace the document is being uploaded to.
Tags: select any desired tags from the drop-down menu. The available tags displayed are based on the tags configured for the selected Workspace.
Message: enter a message to clarify the document request in this field.
When all the fields are completed, click Request to send the document request.
Activity types
To view the currently configured types of activities in the database, navigate to .
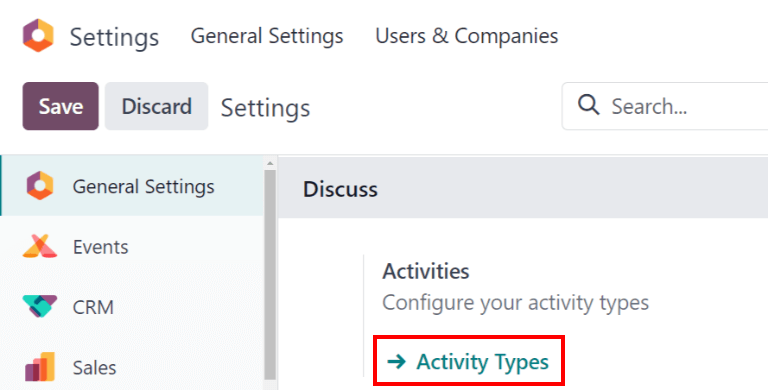
Doing so reveals the Activity Types page, where the existing activity types are found.

Edit activity types
To edit an existing activity type, click on the activity type, and the activity type form loads.
Make any desired changes to the activity type form. The form automatically saves, but it can be saved manually at any time by clicking the Save Manually option, represented by a (cloud upload) icon, located in the top-left corner of the page.
Create new activity types
To create a new activity type, click New from the Activity Types page, and a blank activity type form loads.
Enter a Name for the activity type at the top of the form, then enter the following information on the form.
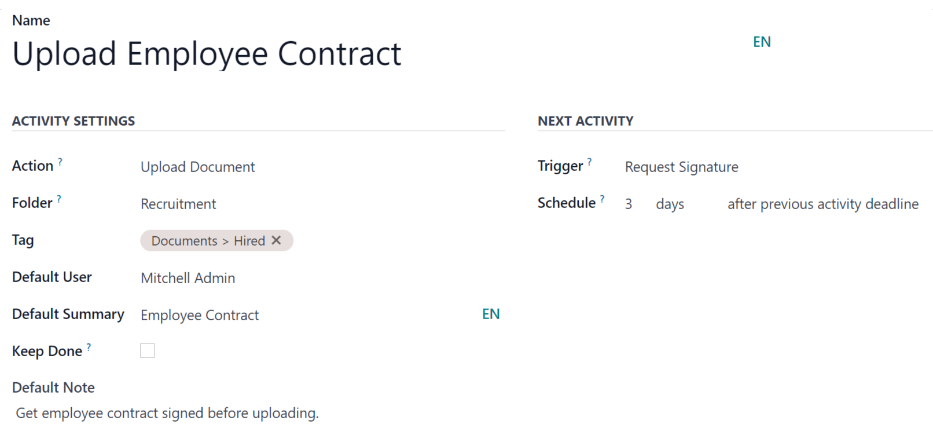
Activity Settings section
Action: using the drop-down menu, select an action associated with this new activity type. Some actions trigger specific behaviors after an activity is scheduled, such as:
Upload Document: if selected, a link to upload a document is automatically added to the planned activity in the chatter.
Call or Meeting: if selected, users have the option to open their calendar to select a date and time for the activity.
Request Signature: if selected, a link to open a signature request pop-up window is automatically added to the planned activity in the chatter. This requires the Odoo Sign application to be installed.
Note
Available activity types vary based on the installed applications in the database.
Folder: select a specific workspace folder to save a document to. This field only appears if Upload Document is selected for the Action.
Using the drop-down menu, select the Folder the document is saved to.
Default User: select a user from the drop-down menu to automatically assign this activity to the selected user when this activity type is scheduled. If this field is left blank, the activity is assigned to the user who creates the activity.
Default Summary: enter a note to include whenever this activity type is created.
Note
The information in the Default User and Default Summary fields are included when an activity is created. However, they can be altered before the activity is scheduled or saved.
Keep Done: tick this checkbox to keep activities that have been marked as
Donevisible in the activity view.Default Note: enter any notes to appear with the activity.
Next Activity section
It is possible to have another activity either suggested or triggered. To do so, configure the Next Activity section.
Chaining Type: select either Suggest Next Activity or Trigger Next Activity from the drop-down menu. Depending on the selected option, either the Suggest or Trigger field is displayed.
Note
The Chaining Type field does not appear if Upload Document is selected for the Action.
Suggest/Trigger: depending on what is selected for the Chaining Type, this field either displays Suggest or Trigger. Using the drop-down menu, select the activity to recommend or schedule as a follow-up task to the activity type.
Schedule: configure when the next activity is suggested or triggered.
First, enter a numerical value indicating when the activity is suggested or triggered.
Next to this field, a Days field is visible. Click Days, the default option, to reveal a drop-down menu. Select the desired time-frame option from the list. The options are Days, Weeks, or Months.
Lastly, using the drop-down menu, select whether the activity is scheduled or triggered either after previous activity deadline or after completion date.
