Manage user accounts
In Odoo’s Lunch application, users pay for products directly from their Lunch app account. For funds to appear in their account, a Lunch app manager must transfer funds into each user’s account.
Important
To add funds and manage user accounts, the user must have Administrator access rights set for the Lunch application. This is verified by navigating to . Then, click on a user to view their various settings and access rights.
For more information, refer to the Access rights documentation.
The Lunch application does not directly interface in any way with software or products linked to any monetary accounts or billing. Money cannot be transferred from users’ bank accounts, nor can users’ credit cards be charged.
Odoo’s Lunch application only allows for manual entries of cash exchanges that are handled by the Lunch app manager. It is up to each individual company to create the method with which lunch accounts are replenished.
Example
Some examples of how money can be organized and transferred within a company:
Cash is handed to the Lunch app manager, who then updates the user’s account.
Money is automatically deducted from the user’s paychecks, then the Lunch app manager updates the account when paychecks are issued. This requires adding a salary attachment for the user’s payslip in the Payroll app.
Companies can sell “lunch tickets” at a set price (for example, one ticket costs $5.00). Users can purchase tickets from a Lunch app manager, who then updates the user’s account.
Cash Moves
To add funds to user accounts, each cash move must be individually logged. To view all cash move records, or create a new cash move, navigate to . Doing so reveals the Cash Moves dashboard.
On the Cash Moves dashboard, all cash moves are presented in a default list view, displaying each record’s Date, User, Description, and Amount. The total of all the cash moves is displayed at the bottom of the Amount column.

Add funds
To add funds to a lunch account, click the New button, located in the top-left corner of the Cash Moves dashboard.
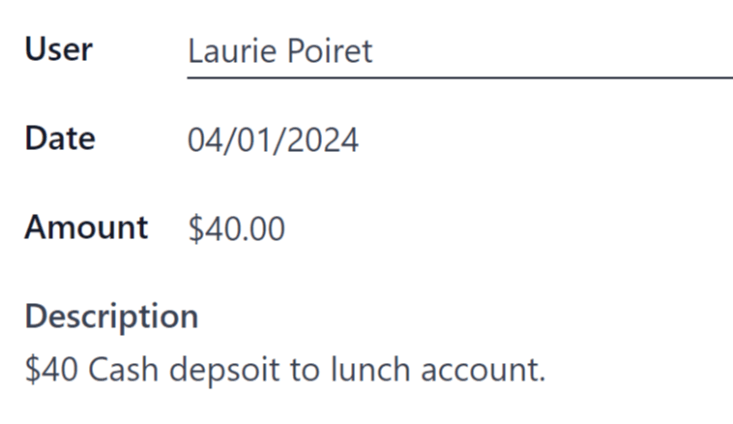
A blank Cash Moves form loads. Enter the following information on the form:
User: select the user depositing cash into their account from the drop-down menu. If the user is not in the database, they can be created by typing their name in the User field, and clicking either Create “user” or Create and edit… to create the user and edit the Create User form.
Date: using the calendar popover, select the date the transaction occurred.
Amount: enter the amount being added to the lunch account.
Description: enter a brief description of the transaction.

Control Accounts
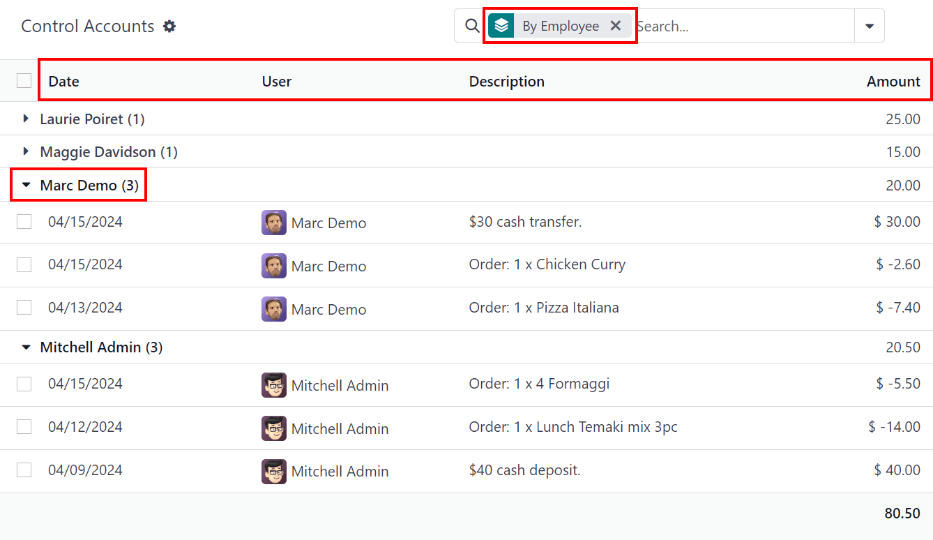
An overview of every transaction in the Lunch app, including all cash deposits and purchases, can be viewed on the main Control Accounts dashboard. To access this dashboard, navigate to
All transactions are grouped By Employee, and listed alphabetically by the user’s first name. At the end of the user’s name, a number appears. This indicates the number of individual records logged for that user.
The default view is to have all individual transactions hidden. To view all transactions for a user, click the ▶ (triangle) icon to the left of the desired name to expand that specific group.
Each record includes the Date, User, Description, and Amount.

Important
This list only displays the various transactions within the Lunch app, and does not allow modifications to be made to any records listed.
Cash moves can be modified, but only from the Cash Moves dashboard, not from the Control Accounts dashboard.
It is not possible to modify any product-related records.